Winter Solstice a Round Journal by Lynne Moncrieff
11:00Hello
This journal started in November, with thoughts of Winter Solstice in my mind which determined a slightly different colour palette for me.
That's Crafty! Craftyboard panels are fabulous for forming into journals and so easy to punch holes for binding.
I will be sharing a flip through of the book on my social media and there I hope to capture the colours with the hints of Interference Gold Paint.
Supplies
That's Crafty! Clear Stamp Set Lynne's Affirmations Set 8
That's Crafty! Clear Stamp Set Lynne's Scribbled Words Set 1
That's Crafty! Clear Stamp Set Lynne's Scribbled Words Set 2
That's Crafty! Craftyboard Round Panels
That's Crafty! Gesso White
That's Crafty! Texture Paste
That's Crafty! Walnut Ink Crystals
That's Crafty! Interference Gold Paint
That's Crafty! Multi-Surface Paint White
That's Crafty! Lustre Spray Silver, Aubergine
Stamperia Rice Paper A4 Cosmo Deer
FineLiner Applicator Bottle
Extras: Deli Paper, Dried Elements, Muslin Scraps, Small Buttons
Instructions
I worked with 7 Rounds and the first step, prepping with white Gesso. I know it isn't necessary and it is really personal preference and for me, I prefer to prepare with Gesso, providing me with the surface that I like to work with.
Step photos are limited but I will share the photos I do have, to give a wee insight into my process.
After spraying Lustre Sprays and Walnut Ink on the panels, they were then misted with water, manipulating the panels to allow the colours to drip before laying flat to air dry.
Initially I found that after leaving to air dry, the colours were too pink for me and not the depth I was aiming for but that was okay, I simply repeated the process.
Those pieces were adhered to the pages, also with torn pieces of muslin stained with walnut ink, creating layers of texture.
Once all panels were dry, it was time to look at the rice papers,
tearing into small pieces
With a Fineliner Bottle (filled with Fluid Titanium White), small dots applied.
Another detail
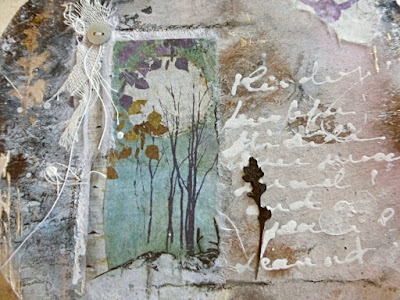
The details show the layering of the torn Rice Paper images along with muslin.
Other Details:-
After working on all the inside pages in this way, I then, with a palette knife, mixed White paint with Texture Paste, creating small areas of texture.
Returning to the Fineliner Bottle, some free flow writing.
Finished Details:-
The flip through will show the full pages, here I wanted to focus on finished details of pages.
A Scribbled Words was stamped with Jet Black ink around the Rice paper image then dipping my finger into White Paint and smudging over the stamping.
Dried elements were incorporated to evoke that sense of nature during winter, the presence of nature although in a more stark form, the black also brings contrast against the soft backgrounds and it also brings another textural element to the book.
Looking through the Affirmations stamps, selecting particular words, mixing around so that they will be scattered throughout the book.
The journaling with the Fineliner Bottle can be seen in the background along with repeatedly stamping with Jet Black ink, one of the Scribbled Words stamps.
The rice papers are wonderful to work with especially for selecting particular imagery.
Embellishments were really kept to a minimum, other than the dried elements here I added tiny buttons which capture the light and remind me of winter.
A final detail to share...
For the cover....
A Craftyboard circle, covered with a piece of the rice paper, layering to the cover with fragments of handmade paper. Then simply a matter of embellishing with dried natural elements and of course, touches of Interference Gold Paint.
Three holes were punched and the panels bound together to form a book with cotton covered cotton wire.
Thank you for visiting my first blog post for 2021.
Wishes
Lynne


2 comments
Some very beautiful inspiration from this lovely post. Loving the colors and beautiful layers of Lynn's unique designs. Enjoyed the detail process on this page. Thanks for the fun
ReplyDeleteSylvia
ReplyDeleteThank you so much for your kind words.
It was enjoyable to work in this book.
Thank you for taking the time to leave a comment on our blog, we really appreciate it.
Note: only a member of this blog may post a comment.