Peace & Joy by Amanda Southern
11:00 Hi Everyone
I can't believe that this week, still in November, I am sharing with you a Christmas make. Every previous year my Christmas makes have always been a last minute dash, but this year is not like any other year!! The current situation has brought the lane I live on much closer together, so much so we are all decorating the outside of our homes and we have a lane official Christmas lights switch on this coming Saturday so my thoughts are with Christmas so much earlier than normal, and to be be honest I have never previously decorated the outside of my house so this is even more of a year of change!
So with my thoughts unusually at this time in Christmas mode I have a couple of Christmas tags to share this week, both using the fabulous characters of Janet Klein for AALL & Create.
Here's What I Did:
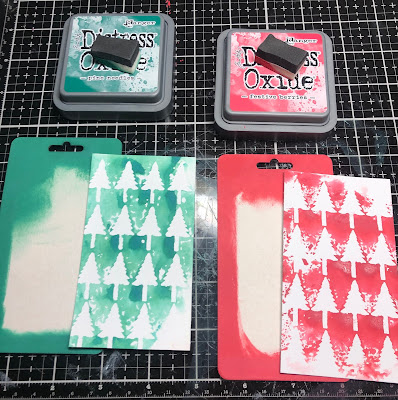
My starting substrate was a couple of That's Crafty! Craftyboard tags and along with those some mixed media card, you could use water colour card, and That's Crafty! 6" x 6" Christmas Tree stencil. I used 2 colours of Distress Oxides Festive Berries and Pine Needles and created two coloured background pieces to go onto the tags by tapping the Distress Oxide ink pad directly onto the stencil, spritzing then with water and laying the stencil, ink side down onto the card to get an impression of the stencil, I randomly applied the Oxides as I didn't want a perfect image. Doing this technique of using your stencils as a stamp make sure you place a piece of kitchen roll over the stencil as you press it down to capture any of the colour that leaks under the stencil. This is a fabulous technique to get more mileage from your stencils. Directly onto the Craftyboard tags I coloured around the edges with the Distress Oxides using Cut & Dry Foam, no need to cover all the tag as you will cover it up with your background card.
I did later paint over the Oxide with silver That's Crafty! Multi Surface Paint in Silver, the coverage of the paint is quite translucent so you can still see the Oxide colour through it. I then added some stamping detail using stamps from AALL & Create's Deep Focus set which includes the number 25, these I stamped with Versafine Clair.
Next was the embellishments for which I used a That's Crafty! Greyboard piece from the Pine Trees A4 sheet and the wreath, I cut this in half, is from the Craftyboard A4 Sheet Christmas Wreaths and stars.
The wreath I cut in half, keeping one half for another project, and painted the half for this tag with Silver paint, I had some adhesive stars in my stash which perfectly fitted into the cut out stars on the wreath so I added those for a bit of bling. The pine tree I painted using several shades of green paint from the PaperArtsy Fresco Finish paint range adding different layers of colour using a bit of washing up sponge which also adds some texture to the tree. I then added some very fine wire around it and added some more of the stars that I had added to the wreath to make it look like it was dressed up with some star Christmas lights. These were then glued onto the tags.
Next was to stamp the fabulous Christmas girls from AALL & Create's 'Merry & Bright' stamp set designed by Janet Klein and colour them in for which I used Prismacolour pencils and a touch of white pen highlights and cut out with a small white border.
Before adding them to their respective tags I added some different washi tapes so they were grounded onto something on the tags. Final touch was to add a couple of the Christmas words cut from Tim Holtz Christmas label tape roll.
Distress Oxide Ink Pads - Pine Needles & Festive Berries
That's Crafty! Multi Surface Paints - Metallic Silver
PaperArtsy Fresco Finish Paints - Assorted shades of green
Versafine Clair Ink Pad - NoctourneWashi Tapes from my stash but lots of choice available HERE
Prisma colour pencils
Adhesive star gems
Thanks for stopping by and I will see you next Tuesday
Love
Amanda X


1 comments
I love that mistletoe hair - what a delightful festive pair they are.
ReplyDeleteAlison x
Thank you for taking the time to leave a comment on our blog, we really appreciate it.
Note: only a member of this blog may post a comment.