
Atelier Mini Albums by Gill Humphrey
11:00
Last week I shared an altered ATC cabinet designed to look like a set of partially open draws. Inside I have added some altered ATC's made into two mini albums and a single very dimensional ATC. For consistency all paper edges were inked with Vintage Photo Distress Oxide.

The make art and you will have wings to fly album housed in the top draw was created by cutting pieces of white card 3 1/4 high 2 and 2 1/4" wide and scoring at 1" from each end of the short side. The 1" parts were then adhered to greyboard ATCs, linking the ATC's until I had 3 attached to each other giving me 3 pages which were then covered with papers cut from the 8 x8 Atelier des Arts paper pad. On alternate pages I then added mats of white card cut at 2 1/4 x 3 1/4" to which I had added stamping details using Art and Nature is Art stamp sets and Vintage Photo ink. On both sides of the central page I then added pockets cutting paper 3 inches wide and 2 1/2 inches tall and scored on three sides at 1/4 and 1/2 inch to allow me to have a flap to adhere by pocket to the page. On the first of these I added a chipboard pair of scissors and quote before popping into the pocket die cut brush, paint tube and bottle. For the second pocket I created a mini concertina fold piece of paper measuring 10 1/2" long scored at 1 1/2" intervals and 2 1/2" tall to which more stamping detail was added before adhering a rectangular chipboard die cut with poppies to the front.


For the cover a greyboard ATC, an ATC that had been reduced in width by
cutting off the rounded edges and then another full ATC were adhered to
white card ensuring that I had left spaces between to allow the
elements to move. The front and back surfaces were then covered with
more papers before the set of three pages were adhered centrally. On the
inside of the front cover I added another pocket and concertina fold
paper element cut to fit the chipboard element Objects with stories to
tell become arts which was adhered to one end.


On the inside back cover I added a similar concertina fold piece with the rectangular diecut with birds nest adhered to the front and the last piece adhered to the inside of the cover so that it created a fold out piece.

On the front of the album I added a piece of the door decorative chips, a quote cut from the papers and chipboard heart.
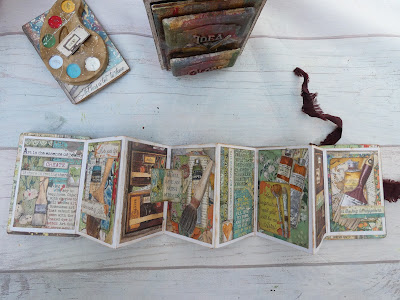

Housed in the lower draw is a much simpler concertina fold album made using MDF ATC's for the front and back cover and a long piece of white card folded at 2 1/42 to give 9 "pages". The MDF pieces were covered with pieces of paper from the 8 x 8 paper pad and then adhered to each end of the concertina fold card sandwiching in a piece of shabby ribbon on the back ATC.

The white card was then edged with Vintage Photo Distress Oxide and then mats of decorative papers added. Each page was then decorated using elements fussy cut out from the paper collection ensuring that there was an appropriate art related sentiment on each page.

On the front of the album I added a die cut frame and then a plaque cast using Amazing Casting Resin and Atelier Tags Mould coloured in the same way as the pieces used on the front of the cabinet (last weeks blog post by me contains the paint details) before adding gold microbeads.
The final piece in the cabinet is a single ATC covered with paper to which I added the paint palette cast to one side and brushes to the reverse side.


1 comments
Excellent 😍
ReplyDeleteThank you for taking the time to leave a comment on our blog, we really appreciate it.
Note: only a member of this blog may post a comment.