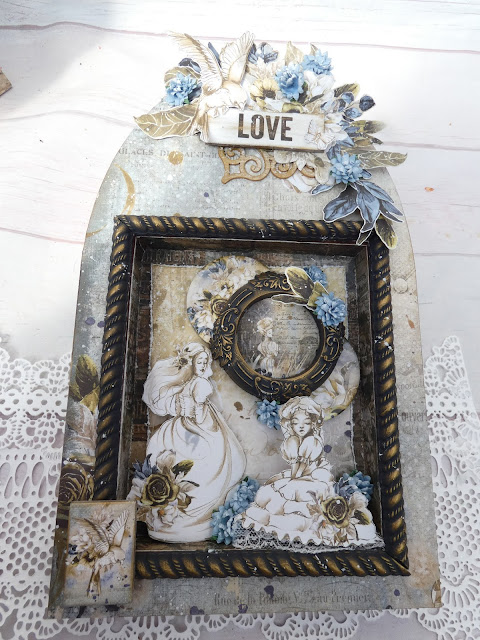
Love by Gill Humphrey
11:00With a bit of luck we will be able to celebrate weddings fairly soon and I thought this week I would make a project focused on love. Whilst this is a dimensional piece that will add a special touch to a home by adding a pocket to the back you can easily add a tag with a message making it into a card as well.
The base for this piece is a That's Crafty! large Art Shrine which I constructed using That's Crafty! Multi Purpose Glue and leaving off the front panel to make decorating easier. I then cut papers from the Lovely when you Smile 8 x 8 and 12 x 12 and used these to decorate the inside of the box and the front panel. In addition I fussy cut a lot of elements from the co ordinating Journal Extras pack and the extras sheet and Leaves XII .
I created a frame using air dry modelling material by Prima and left it to dry before painting with That's Crafty! Black Gesso and adding Vintage Gold wax to the surface. There are number of suitable moulds on the website - Frames mould by Stamperia has a lovely selection of moulds that are just perfect for this type of project. I adhered part of a tag from the papers behind the frame to create a focal image.
I cut a piece of paper from the pack approximately 2cm smaller than the back of the panel and then distressed the edges before adding a layer of scrap cardboard to the back and adhering it in place. Before adhering the frame in place I added two circular chipboard elements from the Lovely when you Smile die cut pack in place so that the frame sat further forward in the piece.
I created some edging moulds using a Prima mould that was in my stash and cut them to fit around the edge of the central niche creating a frame. This was painted in exactly the same way as the frame.
My focal fussy cut girls were then adhered in place with silicone glue. To decorate the top of the shrine I added vintage gold wax to a piece of crafty board taken from Frames 4 and placed this towards the middle of the top before layering on lots of fussy cut flowers, leaves, a bird and buttterfly taken from the papers. I added some paper flowers from my stash for added texture and interest before placing a rectangular piece from the die cut pack in the left hand corner and adding splashes with white gesso.


0 comments
Thank you for taking the time to leave a comment on our blog, we really appreciate it.
Note: only a member of this blog may post a comment.