Life is a Journey Album Part 2 by Gill Humphrey
11:00Today I am going to describe how I created my album covers and the last two pages of my album using the same products from last week namely the wonderful Craft
O'Clock papers - Age of Gentleman. I have used a combination of the 12 x 12, 8 x 8, 6 x 6, Extras sheet, Journal extras and Cardboard die cuts packs and That's Crafty! Multi Purpose Glue Pen glue.
To make the album covers I cut black carstock 25cm by 15 cm and adhered them to mountboard - this means you will need to cut 4 pieces of the black cardstock in total to create mountboard pieces for the front and back covers. Each side of the covers were then covered with paper leaving a small margin of black showing. I then punched holes 1.5cm in from one end and 3cm in from the top and bottom.
The album front was then decorated by adding a thin strip of paper approximately 1/3rd of the way from the bottom before adding a file pocket from the journal extras pack into which I added a small photo mat 10.5cm by 11cm. Then I added a watch cut from the papers along side flags from the journal extras pack and the chipboard die cuts pack. The word strip is also from Craft O'Clock from a collection sold on Hochanda but a Tim Holtz quote chip would work equally well.
The inside of the front cover is as shown above again using a strip of paper to ground the elements.
Page 4:
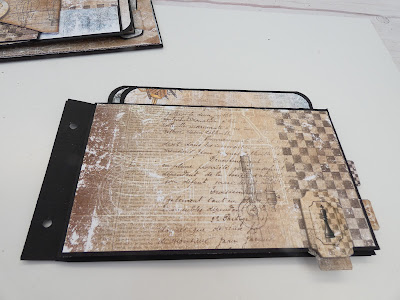
This page uses a base page with long pocket.I first cut two more panels 21cm by 11cm and scored at 2cm along the long edge. The small area was then adhered to the spine part of the page to create a flap on each side of the page.
On the front of the page I then added another flap, this time utilising the top opening pocket to hide the join - the black card base for this flap measures 19cm long and 13cm tall and is scored at 2cm in from the top before adhering into the pocket making sure that the glue did not seep out and the pocket remained functional. I then created two simple matted piece measuring measuring 16cm long by 12cm tall to go into the pocket.
The top flap was then decorated with papers and cardboard die cut using the die cut to act a page turner. The reverse of this piece has a small strip of paper adhered at the top and a cardstock sticker mounted on to black added as a decorative element. When the first flap is lifted it reveals the flap that opens to the left which I have decorated with a belly band cut from the journal extras pack and more cardstock die cuts. Inside the belly band I have added two more photomats.
The inside of this part of the page has then been kept simple with just a layer of decorative paper.
The back of this page has been created using the second piece of black card attached to the spine so it opens to the right again utilising cardboard die cuts and fussy cut elements to act as a page turner.
The inside of this piece has also been kept simple with matted paper pieces.
Page 5:
This uses a basic page with pocket to the short side. On the front I have added a decorative paper strip before adding another belly band with cardboard die cut and slipping in two more photo mats. I have also added another photomat which fits inside the pocket.
The back of this page has mat another strip of contrasting paper to the background paper along side the envelope from the jounral extras pack that has been matted onto black card. A cardboard die cut was added to ensure that the edge of the envelope withstands being lifted up over time.
Back cover:
Using the second piece of black covered mountboard I added decorative paper before adhering the big pocket from the journal extras pack to the right hand side. Inside the pocket are two tags from the papers with ribbon/cardstock stickers to make it easier to lift them in and out along side a large photomat 21cm by 13.5cm and the largest element from the journal extras pack which is 20cm b5 15cm with rounded edges. The front of the pocket was then decorated with a small belly band into which I have tucked more tags.
The back of the album has been kept clean and simple with a layer of decorative paper.
Having created all of my pages all that was left was to slip book rings through the holes and add lots of co-ordinating shabby ribbons. I do hope you like this step by step minibook class and please do not forget to share your makes with the That's Crafty! Creatives friends on Facebook.


0 comments
Thank you for taking the time to leave a comment on our blog, we really appreciate it.
Note: only a member of this blog may post a comment.