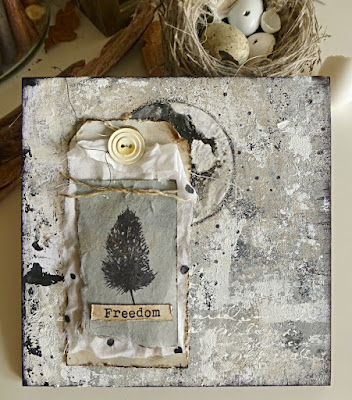
Freedom by Lynne Moncrieff
11:00 Hello
Sharing this 6"x6" panel, which as usual, features lots of That's Crafty! products.
Supplies
That's Crafty! Clear Stamp Set Nature's Gatherings Set 2 A5
That's Crafty! Clear Stamp Set Lynne's Scribbled Words Set 1
That's Crafty! Clear Stamp Set Lots of Words
That's Crafty! Surface MDF Panel 6"x6" Pack of 3
That's Crafty! Stencil Circles TC40002
That's Crafty! Multi-Surface Paint Black, Grey, White
That's Crafty! Pearl Ink Black
That's Crafty! Medium Walnut Ink Crystals (substitute with Powder)
Archival Ink Pad Jet Black
Fineliner Bottle (look HERE)
Tim Holtz Idea-ology Tiny Attacher
Extras: Tag, Button
Instructions
Onto cardstock the Multi-Surface paints were applied, pressing another sheet of cardstock onto it, creating texture and then decanting a little White paint into fineliner bottle along with Fluid Medium, using this to scribble script onto lower area of panel.
Lying on the table, a stained tag along with fabric and scrappy piece of paper. I decided they would become the focal for this panel. Dots of Black Pearl Ink were applied to the chiffon fabric scrap then onto the blue piece of paper, inking up the feather from Nature's Gatherings stamp set.
Onto scrap of cardstock (stained with Walnut Ink), stamping one of the words from the fabulous That's Crafty! Lots of Words stamp set.
The shipping tag is the base layer, beginning to layer the fabric with the Pearl Black dots, the stamped paper and the stamped word Freedom, attaching with Tiny Attacher and utilizing the stained string from the shipping tag.
Just peeking to the right side of this tag, a piece of painted deli paper (I often use deli paper as underpaper), tracing one of the circles from the A4 Circles Stencil.
Final touch, inking up the surrounding dots on the circle from Scribbled Words stamp set, stamping those marks onto the background panel.
Thank you for your visit.
Wishes
Lynne


1 comments
So incredibly gorgeous and I adore the idea of diluting the white in an old fine liner bottle to create a "paint pen" - genius! xx, Autumn
ReplyDeleteThank you for taking the time to leave a comment on our blog, we really appreciate it.
Note: only a member of this blog may post a comment.