
Love with All Your Heart by Gill Humphrey
11:00
With Valentine's Day around the corner i thought I would create a romantic style piece for this weeks blog post using some very non traditional valentine images with traditional red. For this make I chose to mix across a number of brands which is a trick I often do as it means that you can get the most out of your products. The base of this album is the 6 x6 album from set of 2 greyboard journals and the papers I have chosen to work with are Painted By The Wind Collection. I have used elements taken from the extras set, journal extras, 12 x12, 8 x 8 and 6 x 6 paper packs and the glue I have used through out is the Multipurpose Glue by That's Crafty!
I started by covering all the surfaces of the greyboard with pieces of paper and then trimmed the paper to fit and neatened the edges with sandpaper. Once this had been done I then started to decorate each page using black cardstock throughout to add flaps and photo mounts as needed for each page.

For the inside cover I made a pocket using a strip of paper 2"wide by 6" tall and then mounted this onto black card stock before trimming to leave the contrasting black edge. This piece was then adhered along three slides to create the pocket. Into the pocket I tucked a decorated 5"square black mat, tag and topper element cut from the collection before adding a piece from the collectables to decorate the pocket.

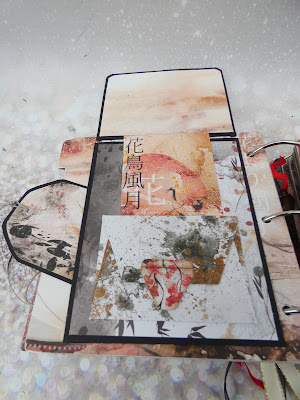
For the next piece I took a 51/2 strip of A4 black cardstock and scored it at 41/2" and 9" - the smaller piece was then folded back on itself to create a pocket. Before adhering this piece on to the journal page I added string to the back of the panel and also onto the front flap so I could close this element with a simple string tie. The added black piece was then decorated with papers as shown with the front cover having a torn paper corner into which I added elements from the collection. The inside of the panel is shown below:

For the next page I cut a piece of black card 41/2 x 51/2" and then decided to add a flap to the top by adhering one of square elements in the collection to more black card stock and adding a score line to attach it to the top of the photomat. The photomat was adhered along 3 sides to create a pocket open from the left.

The opposite page has a fold back "card" again created using a 51/2" strip of A4 cardstock this time scored at 41/2 and 81/2 inches. Before decorating the panels I added string to the back of the larger panel and adhered it onto the base before folding back the smaller panel and adding string to the front of this panel - by doing this you can tie closed both sides of this piece which opens concertina style. The panels were then decorated as shown.

Inside open to the left:

Inside open to the right:

For the next page I created a "gatefold" page by cutting a 4/12" strip of A4 cardstock and then scoring at 4" and 91/4". The inside panels were covered with paper and then a piece of string adhered along the outside pieces down the back and around before attaching to the base. The outside flaps were then decorated with papers.


For the corresponding page I chose to create a pocket along the bottom using a 2" x 5 1/4" piece of decorative papers added to black card stock trimmed to leave a border along the top of the pocket before adhering in place on 3 sides. On top of the pocket I added a 5" black panel decorated as shown and around which string was tied before the whole piece was adhered to the pocket (be sure to only add glue to the bit that will go onto the pocket previously formed). I was then able to add some long tags to the pocket.


The next page has a simple folded card with the top edge trimmed down so the underneath is seen when the page is turned. To create this I cut a piece of black card stock 81/4" x 51/2 strip of black cardstock scored at 334" along the long edge again before adhering in place I added string to the back of the larger panel then decorated the inside as shown. Before decorating the front panel I brought the string from the back around the whole piece.


The opposite page has a pocket on the bottom into which 5" square decorated panels and a tag were added before the pocket front was decorated with tags cut from the papers.

The next page has a simple mat 41/2" x 51/2" decorated with papers. The string has been tied around the back creating a tuck spot meaning that the whole of the matted piece can be used for a photograph when you want to add them.

The following page is the same as the fold back page created earlier on.


The final page has a mat 51/2" tall by 131/2 long scored to give three equal sized panels which has been decorated as shown below:


The inside back cover is made in the same way as the inside front cover pocket.
For the front of the album I created some Amazing Casting Resin pieces using the fan from the Pagoda Mould and floral scroll and round icon from the Plates Mould. The fan and icon were painted with Anthracite paint and then dry brushed with Coral Red paint and then a little Gold Metallic Wax. The floral scroll was painted with Cookie paint with the flower highlighted with a mixture of the coral red and some white paint. Once the paint on this piece was dried I used Vintage Antiquing Paste to mute the colours down - wiping off the excess with a baby wipe. Having created the embellishments I layered paper elements and the resin pieces along with a little gauze as shown before adding Fine Rose Gold glitter to the centers of the cherry blossoms.
I hope you have enjoyed this tutorial and understand that by simply altering how you fold a piece of cardstock you can now add lots of interests to an album. As usual if you are inspired by this make please post your make to the That's Crafty! Creatives facebook page and tag me in the comments so I can see what you have done.


0 comments
Thank you for taking the time to leave a comment on our blog, we really appreciate it.
Note: only a member of this blog may post a comment.