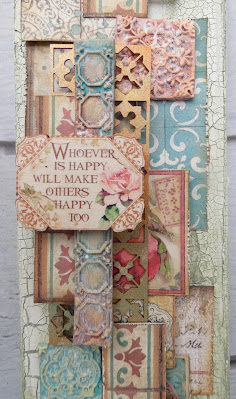
Whoever Is Happy by Gill Humphrey
11:00Sometimes we have an awkward space that needs just a little something and creating your own art allows you to create what ever size and shape you need. The base for my make this week is a canvas that is approx 4" wide by 20" long. The long this nature of this base allows you to use up all of the little scraps of paper that we all can't bare to throw away. These pieces layered collage style with key embellishments allow you to develop a cohesive collage.
To make the decorative background for my piece I painted on a layer of Cracking Primer concentrating around the edges of the canvas as I knew my composition was going to go down the center. Once the primer had dried - it changes from white to clear and feels almost dry to touch I then used a palette knife to add White 3D Cracking Paste over the primed areas. By varying the thickness of the cracking paste you get a mixutre of small and big cracks which adds to the interest in the background. The paste can be allowed to dry naturally but is heat stable just perfect for the inpatient crafter. To highlight the cracks I then painted over a layer of Country Green Lasur Gel. When working with this medium I suggest you work in sections as you can lift off the colour leaving it in the cracks whilst the gel is wet but once dry it is permanent.
I then chose off cuts of papers taking my lead from the tiled paper in the 12 x 12 Casa Granada paper pack and then trimmed some extra off cuts to fit. I then distressed the edges of all of the paper pieces using my scissors. For added interest I made some air dry clay embellishments using the Plates and Tiles moulds and once dry painted them with Gold Sand Allegro paint before using some of the new Vintage Patinas - I chose to use the Rust for some of the makes and Turquoise for others. Like the Lasur Gels these can be wiped back whilst wet to leave a distressed feel to the finished pieces.
I had some left Tiles Decorative Chips which I covered with tacky glue letting it go tacky before applying Brass, Gold and Gecco Green Chrome Powder.
Having prepared all of my pieces I then arranged them on my project adding some directly to the canvas before positioning the clay pieces in place and then building more layers using cardboard off cuts as I went. The final pieces of my project were taken from the wooden shapes set that goes with the paper collection.
I hope you have found this tutorial useful and if you make something inspired with it please tag me in your make.


0 comments
Thank you for taking the time to leave a comment on our blog, we really appreciate it.
Note: only a member of this blog may post a comment.