Vintage Storage by Gill Humphrey
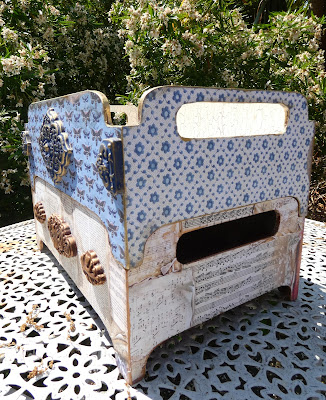
11:00When you are running short of horizontal space and need more storage units that are stackable offer the perfect solution and being able to customise them makes them even better. For this weeks make I have used the stackable trays from That's Crafty! - these have no insert making them ideal for storing lots of die cuts and ephemera pieces. Please note that I bought two of them as they are sold in single units.
I started by constructing the units using Multi Purpose Glue and made sure that had set properly before starting to decorate. I knew I was going to use papers from the Vintage Libary 12 x 12 Backgrounds for the outside of the trays. This paper offers a good range of colour ways with lots of classic styles meaning that you can use it for many different decorative styles and making it a fabulous addition to your crafty stash as it really does not have to be used for a themed project. I chose the papers I was going to use so that I could then decide on co-ordinating colours for the inside of the trays.
For the blue tray I chose to work with Navy Blue Allegro, a layer of Crackle Glaze and a top coat of Milk White letting each layer dry before moving to the next one. Whilst I typically apply my top layer with a sponge this time I painted the top layer on giving me bigger and more directional cracks and allowing me to easily get into the corners as it is important with using crackle that you don't overwork areas you have already applied the top layer to.
For the second tray with script on the outside I used Chocolate Allegro, then the Crackle Glaze with Nougat for the top layer. Generally when I am working with crackle I use a dark first layer and a paler top layer but the options are of course entirely yours.
Whilst I had my paints out I also painted the underside of the trays as I did not want to cover them with papers as they will not be seen.
You will get both sides of the box from one sheet of 12 x 12 paper if you cut carefully making these relatively economical to decorate. I simple cut strips the correct height and adhered them in place. Once the glue had I sanded off the excess paper and then used gold metallic wax around all of the edges.
To decorate the front of each box I then used some Amazing Casting Resin to make some icons using the Plates mould. Once set I primed the resin with Bonding Primer and let it dry before painting with the colours I had used for the base layer of the respective trays. The details were then highlighted with more gold metallic wax.
Now all that is left for me to do is decide what I am going to store in them!


0 comments
Thank you for taking the time to leave a comment on our blog, we really appreciate it.
Note: only a member of this blog may post a comment.