Memories by Gill Humphrey
11:00I do like to create my albums from scratch but sometimes card alone is just not going to cut it. For this album I took some 13cm by 18cm canvas boards and then added my spine using some canvas. I cut the canvas piece to 15cm by 3" and scored at 1/2 from each end of the short edge to give me a guide for gluing this piece of canvas to the edges of the two canvas boards. I then scored 1cm from the top and bottom along the long edge so that I could fold these over to neaten the cut edges of the canvas sandwiching in the middle as I glued the short edges down a piece of canvas 13cm by 2" (I know I mixed the measurements it was just easier for my simple brain). To make the pages for the album I took strips of card 12cm high by 21cm long - on two of these I scored at 17cm and 18cm. The short part of first of these was then adhered to the spine along the front cover of the album and the 1cm area to the spine leaving the page free. I reversed this for the back page - doing this reinforces the join between the spine and covers and also means the page is set back from the fold line. To add the two remaining pages I took card stock 12cm high by 18cm long and scored 1cm in from one edge to create the hinge for the page, the 1cm flap was then aligned with the backs of the pages created previously. This method allows you to create a soft spine that is gently curved rather than flat which adds a little interest to the whole piece and also allows the pages to lie flat when the book is opened out.
Having created the book I then set about decorating it. Each page was covered by cutting paper 11.8cm by 16.8cm from the 12 x 12 Welcome Home paper collection - I cut along the width of the papers to maximise the use of the papers and used the cut off pieces from the strips to create my flaps and pockets. Before adhering in place I distressed the edges with my scissors. BEFORE adding these pieces to the album I created my layouts.
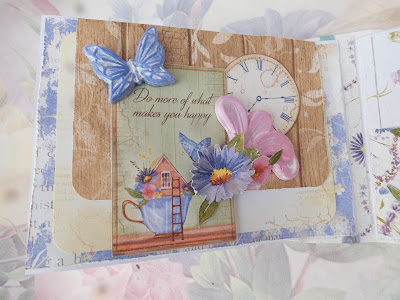
For the inside front cover I created a pocket using one of the left over pieces cutting it two 11.8cm by 6cm and adhered it on three sides. On top of the pocket I then adhered images from the Collectables paper pack along with a painted resin piece. Through out the album there are lots of resin pieces which I cast using Amazing Casting Resin and the house, clocks and butterfly moulds that co-ordinate with papers. To paint the pieces after they were primed with Primer Paste I used a variety of Allegro Acrylic Paints, the Welcome Home selection is a good starting point though I used Brick Red, Lavender, Lilac, Corn Pink and Garden Green for my pieces - just choose colours that appeal to you. Finally I then painted the dried pieces with White Antiquing Gel before wiping back leaving the white in the recessed areas of the pieces.
A number of pages are made in the same way as page two - I took a cut off piece of paper that contrasted with the base page paper scored it at 1" from the edge I wanted to fold under to create my flap, rounded the corners and distressed the edges before adhering the flap to the side of the base paper. I added magnets to the flap and to the back of the base paper before adhering the piece onto my album page.
The front of the flap was then decorated in the same way - cut elements from the Collectables and 8 x 8 papers as the topper from this pad fits more appropriately than the same image from the 12 x 12 papers.
Through out the album I created photo mats using 10.5cm by 14.5cm pieces of white cards with rounded corners. The edges of the photomats were inked with Cream Dye Ink and then the same ink pad used to add text with the stamp from the clocks set and then I used a darker brown with multi generational stamping to add some crackles with another stamp from the same stamp set. Finally I added details to some of the photomats with rub ons taken from the butterfly and manuscript sets.
Pages 5 and 6 have side opening flaps.
Page 7 has a top opening flap and page 8 a transverse pocket.
Page 9 has a side opening flap and the inside back cover a vertical pocket similar to the one on the inside front cover.
To decorate the cover of the album I applied primer paste through the flowers stencil and left it to dry before adding stamping with the cream ink as I had on the pages and also inking round the edge of the album. I layered paper pieces on top of the canvas panels sandwiching in ribbon for my closure.
Finally I added a flower from my stash and some diluted white paint splatters.


0 comments
Thank you for taking the time to leave a comment on our blog, we really appreciate it.
Note: only a member of this blog may post a comment.