
Let's play... Dominoes! ~ by Lotte Kristensen
11:00
Hey everyone!
Remember Archie Starkadder from last week? Well, he turned up on my doorstep, and after a few fumbling starts managed to tell me that he wanted to give his new lady friend - Nellie, is her name - a set of, as he said, 'fancy wee dominoes'. Wednesday is Dominoes night down the local ale house, and Archie had finally mustered up courage and spoken to the lady in question - what better way to cement that friendship than a custom made set of doms?? 'And ye see, she's a wee bit Bohemian like, so I thought she'd appreciate some of they funny wee things that you make'. Well coming from Mr Starkadder, that's praise indeed, so I've set out to make a full set, which is going to take some time, but here's the beginning anyway. Now, personally I don't play dominoes, but you could make these ones into a fun necklace by putting in a tiny screw eye bail, or they're just fun things to have on your desk and fiddle around with instead of your executive stress reliever, or you could make it into a brooch, or you could even use it as an embellishment on a larger canvas, or on a card if you position it nearer the bottom so the card doesn't fall over. They are at any rate fun to make - and a bit addictive 😉
A note about the initial layer of alcohol ink - I used to use those little felt pads, but they actually shed quite a lot of fibre, so I've started using the Cut-N-Dry foam instead. You only need tiny little pieces, and you can re-use them, and it's just a better finish. A note of caution about StazOn ink - it should not be used with clear (polymer) stamps as this will damage them.
Okay, so let's get started!
Materials Used:
Rubber Moon Stamps - Fridafly
Carabelle Studio Stamp - Moroccan Tile
AALL & Create Stamp Set #39
PaperArtsy Sara Naumann Stamp Set - ESN33
Carabelle Studio Stamp - Typographique
StazOn Midi Ink Pad: Jet Black
Alcohol Ink Lift ink pad
Ranger Inkssentials Cut-N-Dry Foam
Tim Holtz Alcohol Ink: Butterscotch
Tim Holtz Alcohol Ink: Eggplant
Tim Holtz Alcohol Ink: Raspberry
Tim Holtz Alcohol Ink: Stream
Tim Holtz Alcohol Ink: Terra Cotta
Tim Holtz Alcohol Ink: Citrus
Alcohol Blending Solution
Dominoes
Promarker: Sand
Gold Krylon pen
Baby wipes
Washi tape and embellishments of your choice
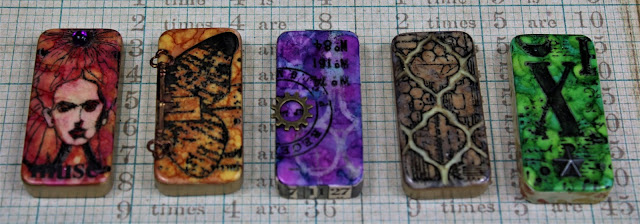
The way to achieve this sort of faux marbled look is by first adding a drop of alcohol ink to the surface of a domino and quickly, using a piece of Cut-N-Dry foam, spread the ink about, and then let dry. Next, you take the same piece of foam and add just a single drop of contrasting alcohol ink, then dab it all over the surface, until you're satisfied with the pattern. Use a different piece of foam with each domino, or you end up with the dreaded mud! The great thing is that if you really don't like the result, it's easy to remove the alcohol ink, either with Alcohol Blending Solution, or just ordinary rubbing alcohol.

From the left, it's a Terra Cotta base with Butterscotch on top; Stream with Citrus; Eggplant with Raspberry; Butterscotch with Raspberry; and Eggplant with Terra Cotta. Leave to dry thoroughly, about half an hour.
Now for stamping -

For these two, I simply used the Carabelle Studio Typographique stamp on the left, and the large butterfly stamp from the Sara Naumann set on the right. Stamp with Black StazOn - as plastic surfaces tend to be quite slippery, with larger stamps it's a bit easier to ink up the stamp and then gently press the domino on top.


Remember Archie Starkadder from last week? Well, he turned up on my doorstep, and after a few fumbling starts managed to tell me that he wanted to give his new lady friend - Nellie, is her name - a set of, as he said, 'fancy wee dominoes'. Wednesday is Dominoes night down the local ale house, and Archie had finally mustered up courage and spoken to the lady in question - what better way to cement that friendship than a custom made set of doms?? 'And ye see, she's a wee bit Bohemian like, so I thought she'd appreciate some of they funny wee things that you make'. Well coming from Mr Starkadder, that's praise indeed, so I've set out to make a full set, which is going to take some time, but here's the beginning anyway. Now, personally I don't play dominoes, but you could make these ones into a fun necklace by putting in a tiny screw eye bail, or they're just fun things to have on your desk and fiddle around with instead of your executive stress reliever, or you could make it into a brooch, or you could even use it as an embellishment on a larger canvas, or on a card if you position it nearer the bottom so the card doesn't fall over. They are at any rate fun to make - and a bit addictive 😉
A note about the initial layer of alcohol ink - I used to use those little felt pads, but they actually shed quite a lot of fibre, so I've started using the Cut-N-Dry foam instead. You only need tiny little pieces, and you can re-use them, and it's just a better finish. A note of caution about StazOn ink - it should not be used with clear (polymer) stamps as this will damage them.
Okay, so let's get started!
Materials Used:
Rubber Moon Stamps - Fridafly
Carabelle Studio Stamp - Moroccan Tile
AALL & Create Stamp Set #39
PaperArtsy Sara Naumann Stamp Set - ESN33
Carabelle Studio Stamp - Typographique
StazOn Midi Ink Pad: Jet Black
Alcohol Ink Lift ink pad
Ranger Inkssentials Cut-N-Dry Foam
Tim Holtz Alcohol Ink: Butterscotch
Tim Holtz Alcohol Ink: Eggplant
Tim Holtz Alcohol Ink: Raspberry
Tim Holtz Alcohol Ink: Stream
Tim Holtz Alcohol Ink: Terra Cotta
Tim Holtz Alcohol Ink: Citrus
Alcohol Blending Solution
Dominoes
Promarker: Sand
Gold Krylon pen
Baby wipes
Washi tape and embellishments of your choice
The way to achieve this sort of faux marbled look is by first adding a drop of alcohol ink to the surface of a domino and quickly, using a piece of Cut-N-Dry foam, spread the ink about, and then let dry. Next, you take the same piece of foam and add just a single drop of contrasting alcohol ink, then dab it all over the surface, until you're satisfied with the pattern. Use a different piece of foam with each domino, or you end up with the dreaded mud! The great thing is that if you really don't like the result, it's easy to remove the alcohol ink, either with Alcohol Blending Solution, or just ordinary rubbing alcohol.

From the left, it's a Terra Cotta base with Butterscotch on top; Stream with Citrus; Eggplant with Raspberry; Butterscotch with Raspberry; and Eggplant with Terra Cotta. Leave to dry thoroughly, about half an hour.
Now for stamping -

For these two, I simply used the Carabelle Studio Typographique stamp on the left, and the large butterfly stamp from the Sara Naumann set on the right. Stamp with Black StazOn - as plastic surfaces tend to be quite slippery, with larger stamps it's a bit easier to ink up the stamp and then gently press the domino on top.

On this one, I used the Alcohol Ink Lift pad with the AALL & Create stamp - the scissors and tiny arrow. As soon as you have lifted the stamp off the domino, get a baby wipe to take off the ink to reveal the ghostly image beneath. I stamped with black StazOn for the other images - I'm really sorry but don't know what stamp set this came from, but any other small image stamp will work just fine!

This domino was stamped with the Carabelle Moroccan Tiles stamp in black StazOn, and when that was thoroughly dry, I used a sand coloured Promarker pen to lift away the colour between the tiles, wiping the tip of the pen with a baby wipe to remove the excess. I really like this effect, and the next tile uses this technique too!

Here I used the Rubber Moon Fridafly stamp, and when that had dried thoroughly, once again I used the sand coloured Promarker pen to very carefully lift off the ink from Frida's face. Make sure you don't touch the black lines, as this colour will come away too! Keep on wiping off the tip of the Promarker to remove excess colour.
To finish, I added Gold Krylon around the edges of some of the doms, and Washi tape for others, tucking in the edges onto the back as needed. Then some very small embellishments, stuck on with a tiny dab of superglue - details are on the photo at the very top of the page.
Well, I hope you enjoyed this week's adventure - I'm off to play with the alcohol inks on some acrylic and metal surfaces and, who knows, might even show some of them at a later date!
Lotte x


6 comments
Lotte, love your story , that Mr. Starkadder is sure in love, LOL -
ReplyDeleteand love your domino`s they hold so many details and great technique with the Promarker !!
Hilsener fra Bornholm :-)
Really loved reading about Archie and his lady love and the dominoes are absolutely stunning.
ReplyDeleteSo colourful and full of amazing detail and need to find my alcohol inks to try this out now!
Fliss xx
Lotte, you used some fantastic techniques, I really love the alcohol lift one and the tile one is just fabulous. Such a wonderful back story too, it was great fun reading that. Anne xx
ReplyDeleteJust love Archie, fabulous dominos using great technique’s
ReplyDeleteLove
Amanda x
Aww, thank you all for your lovely comments - I'll let you know how Archie's new lady love likes the dominoes :D
ReplyDeleteA fabulous quintet of creativity , Lotte . Lots of inspiration to be had - tfs x
ReplyDeleteThank you for taking the time to leave a comment on our blog, we really appreciate it.
Note: only a member of this blog may post a comment.