Crafting Supplies - A Little Journal by Gill Humphrey
11:00I know it is perfectly possible to buy journals pre made and to buy dies that will cut the covers out for you but they can be shall we say limiting. Well have no fear Liz Wheeler has designed a set of templates - Templates Set 2 - which once you get your head around them are actually really easy to use - the added bonus is you're no longer restricted to what's available on the shelf. Whilst I am sure paper piecing is possible when cutting your components - particularly the cover I think it is worth buying good quality A3 card as the template for these journal covers is larger than A4.
This cover is probably using these templates at their simplest - simply place on A3 card draw around and make sure you mark the points for the spine. Then move the template to your right and line with the 'V's from drawn before and use a ball tool to score through the gaps in the stencil at these points. Then fold on these lines and burnish well.
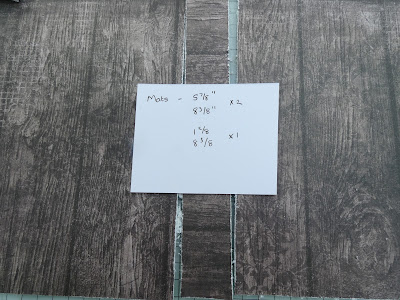
You can then set about decorating your cover. I used the wood grain paper from the Craft O'Clock Gray Mood paper collection and cut as shown in the image below. For consistency through out the journal I scuffed the edge of the papers with my scissors - but a distress tool will also do the job perfectly.
Once the front was completed I stamped the words "Crafting" and Supplies" from Journal It Stamps set by Liz Wheeler on to a piece of stamping card and then added a mat of co-ordinating paper before adhering on to the front of the journal. For my stamping I used Versafine Nocturne ink.
I used a similar process for the inside of my journal covers but changed the dimension of the spine piece slightly so that it allowed more flexiblity at the hinges.
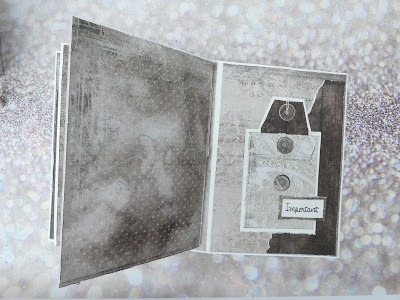
I realligned the original template using the notches to mark the center of the area with lots of holes in the template and then marked two at the top and bottom and the central one before making holes in the cover through which elastic was threaded. I ran a piece of elastic cord from top inside left hole across the back to right upper hole and then down the inside to bottom left then across the bottom and back to the inside of the journal cover and simply tied the ends together. This gives two elastic strands through which mini journals can then be slipped in or out. I added some string with handmade paper beads and natural wooden beads to the top elastic (see picture). The handmade beads are easy to create - simply cut a long triangular strip approximated 2cm wide at the bottom and then wind up from the widest end - to create the hole through the middle I wrapped mine round a kebab stick.
To create my elastic closure I took another length of elastic through the central single hole and then created a loop big enough to comfortably go round my journal before taking the elastic back through the initial hole and securing with an over hand knot.
Having created the outside of the journal I then created the inside booklets by drawing round the page template and scoring in the middle. I created two booklets using A4 card so that they felt substantial and filled the inside with cheap computer paper. You will find that as you add pages the edge of the pages pokes itself further away from the initial page - I chose to trim these back but you could just as easily leave them as they are but be mindful the more pages you add or if you add thicker card pieces this white edge will extend further. Once the page template has been drawn around you need to score the center fold line and then align the notch with 5 holes to the centre fold line and mark the 5 holes with pencil - these mark the areas you will sew through to create a basic signature (a posh word for a bundle of pages held together). It is more accurate to make the holes in each piece separately but I have to confess life is too short so I stacked my pages together and used a pokey tool to make them in one go. I then simply sewed the pages together starting from outside at the middle hole and working up and down though the holes and then knotting off the ends.
Now all that was left was to decorate the inside cover and covers of the signatures. To do this I added torn paper corners to the inside front and back covers adhering on 3 sides to create pockets.
Added some more stamped labels and finally used another of the templates to make little envelopes. To do this simply choose the envelope size you want - I used a couple of different sized ones - draw around on your chosen paper and mark the score lines then cut out. Don't forget to mark the holes for the closure mechanism. I have used brads in this album for my closures and reinforced the areas where they go through the pattern paper with two punched circles of paper - if you don't have punches no problem as there are two circular templates you can draw around. I layered a small on to a large circle and pushed the brad through this and then the pocket. To prevent the brad legs getting caught I then added another circle over the inside. The simply tied on some cord around the legs of the top brad below the paper circles and wound it round the lower one.
From here on out it really is up to you how complicated you decide you want your piece to be - I have kept mine fairly simple making this a really easy make for some one you has never attempted anything like this before.


0 comments
Thank you for taking the time to leave a comment on our blog, we really appreciate it.
Note: only a member of this blog may post a comment.