
An Art Adventure Handmade Book with Acrylic Wax by Lynne Moncrieff
11:00Hello

Here I worked with the Liquid Acrylic Wax on papers for the cover. I need to add that I did use a piece of stabilizer, to provide that extra layer of stability for the cover.
If you like books with a tactile quality, then the Liquid Acrylic Wax certainly brings that to all manner of papers.
I don't have photos of all the steps because I have a habit of creating batches of papers, storing in my stash but I will talk through the process.
Supplies
That's Crafty! Lynne's Mark Making Stamp Set 1
That's Crafty! Lynne's Mark Marking Stamp Set 2
That's Crafty! Clear Stamp Set ATCoin 11
That's Crafty! Walnut Ink Crystals and Tea bag Paper Pack
That's Crafty! Lustre Spray Aubergine, Lustre Gold
That's Crafty! Liquid Acrylic Wax
Memento Ink Tuxedo Black
Needle
Waxed Linen Thread
Papers for Page Inserts
Awl
Stabilizer and Iron
Instructions

So, I dipped into my stash of prepared papers and firstly, pulled out a piece of Walnut Ink Crystals and Lustre Aubergine, stained tea bag paper, already prepared with the Liquid Acrylic Wax, which I had ironed to a piece of stabilizer..ironing before applyiing the Liquid Acrylic Wax.
Next, I took another piece of Walnut Ink stained paper, which would form the inside cover. I applied the Liquid Acrylic Wax, allowing to dry before commencing.
Paperclips or mini cramps are a great aid. I had three layers at this stage, the photo below is the upper layer (front cover), stabilizer is the middle of the sandwich with the other piece of stained paper the inside cover.
I often machine stitch but decided I wanted hand-stitching for this cover, so with an awl, I created holes around all four edges.

I cannot give the guarantee that the Liquid Acrylic Wax will work as an adhesive for all paper types but so far, I've used it as an adhesive for Tea Bag Paper, Rice Paper, Handmade Paper, Skeleton Leaves.

This was left to dry before I hand-stitched, with brown cotton thread, around the edges.
I had a stack of papers already prepared for this size of book. Maybe I work in a strange way, in that, when possible, I always create too much of what I need, knowing there will be a time, it can be many months away, when I can utilise those pieces.
The papers were separated into bundles of four, as I wanted four signatures for this book. With the awl, I formed holes in each bundle. For the cover, there were four rows of four holes.
With waxed linen thread, the signatures were stitched into the cover.

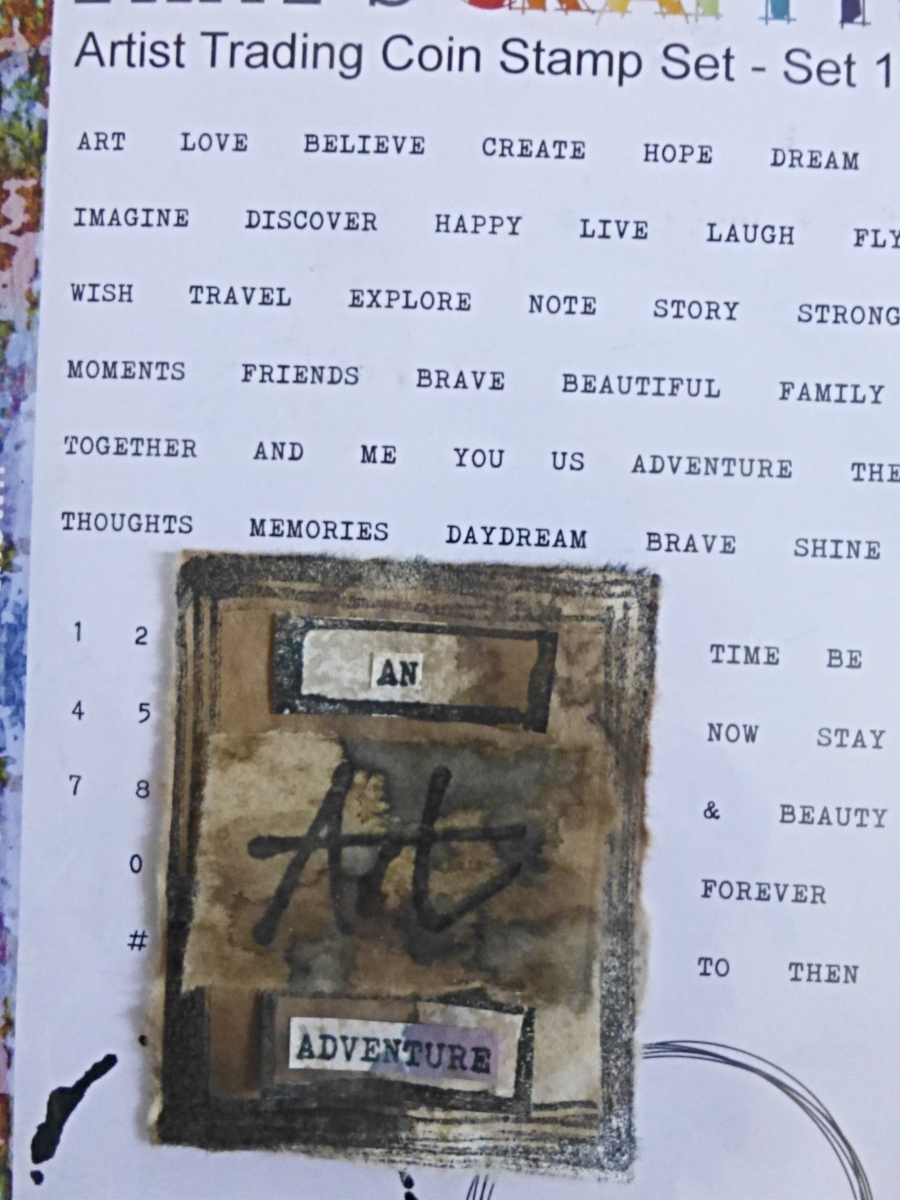
Onto pieces of tea bag paper, again stained with Walnut Ink Crystals, two of the trio of frames from Mark Making Set 1, Art and large frame from Set 2, stamped onto the paper.

I selected An, Adventure, cutting into word tiles, to place inside the stamped frames.


For stamped pieces, I have both stamped prior to applying the Liquid Acrylic Wax and stamped after the application.
Thank you always for taking the time out of your day to stop by.
Wishes
Lynne


11 comments
Really gorgeous layers as always Lynne and love how the wax really brings the colours to life. Such a wonderful cover for the book.
ReplyDeleteFliss xx
Thank you Fliss.
DeleteI couldn't agree more, the wax brings life to the papers.
Lynne xx
Lynn, this is really beautiful. Love the wax painting.
ReplyDeleteThank you Nancy!
DeleteIt is so beautiful a creation-
ReplyDeleteThe wax makes wonderful results, giving the feeling, the same as of old Dutch paintings, it looks gorgeous, Lynne. Such fantastic work, with all the signatures so lovely bound . <3 xxx
Wonderful Art Lynne. Have just bought the acrylic wax, so, all set for some experiments of my own! Xx 😍
ReplyDeleteHazel, You are in for some fabulous art time!!!
DeleteGorgeous Lynne. Love your vintage makes ❤️❤️
ReplyDeleteThank you so much Tracy xx
DeleteAbsolutely Stunning! Lynne. x
ReplyDeleteThank you so much Amanda xx
DeleteThank you for taking the time to leave a comment on our blog, we really appreciate it.
Note: only a member of this blog may post a comment.