
Hello
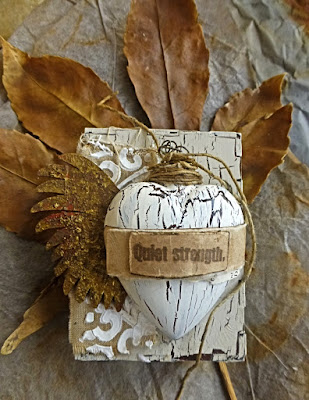
This week I returned to play with one of the wonderful MDF Chunkies.
The Chunkie can be displayed standing upright or resting on an easel but I liked the idea of it displayed resting on a large leaf, there is something nice about randomly picking it up, nestling in the hand, pretending it is a talisman.
Supplies
That's Crafty! Clear Stamp Set Lynne's Affirmations Set 4
That's Crafty Multi-Purpose Craft Adhesive
That's Crafty! Surfaces MDF Chunkie ATC (pack of 5)
That's Crafty! Crackle Glaze
That's Crafty! Surfaces Bits and Pieces Greyboard Wings Small
That's Crafty! 8 ins x 8ins Stencil Mandala TC8014
That's Crafty! Multi-Surface Paints: Ivory, Chestnut Brown, White, Antique Gold
That's Crafty! Texture Paste
Plaid Folkart Painted Finishes Kit Rust
Archival Ink Potting Soil
Calico (from That's Crafty! Mixed Media Journal Kit)
That's Crafty! Walnut Ink Crystals
Sandra Evertson Relics & Artifacts Resin Heart
Nettle Yarn
Rusted Wire
Instructions
Prepare Chunkie by assembling with craft adhesive before applying Chestnut Brown paint. Follow this by applying the Crackle Glaze (following instructions) then the top coat of Ivory and White paint. Also prepare the resin heart with the same supplies but with emphasis on the White more than the Ivory paint.
Prepare the stencilled calico by partially stencilling Mandala, with the Texture Paste, onto calico which had been stained with tea and coffee.

For the greyboard wing, the Rust Finish Kit was applied. Once dry, the wing was pressed down into Antique Gold paint which I had smeared onto a silicone craft sheet. I have found this to be a method which gives me the results I am looking for.

Once the elements were prepared, I first layered the scrap of stencilled calico towards the left side of the Chunkie. As I layered the heart to the Chunkie, I trapped the "rusted" wing to the left side of the heart. To the top of the heart, I wrapped rusted wire and some nettle yarn, allowing the tail ends to remain free.

Partially inked Affirmation was stamped onto piece of found card, stained with walnut ink crystals, layered onto another piece of walnut stained found card.

Thank You for taking the time to visit this post.
If Chunkies are new to you, then you might want to take a look HERE at the different sizes/styles available.
Wishes
Lynne

The Chunkie can be displayed standing upright or resting on an easel but I liked the idea of it displayed resting on a large leaf, there is something nice about randomly picking it up, nestling in the hand, pretending it is a talisman.
Supplies
That's Crafty! Clear Stamp Set Lynne's Affirmations Set 4
That's Crafty Multi-Purpose Craft Adhesive
That's Crafty! Surfaces MDF Chunkie ATC (pack of 5)
That's Crafty! Crackle Glaze
That's Crafty! Surfaces Bits and Pieces Greyboard Wings Small
That's Crafty! 8 ins x 8ins Stencil Mandala TC8014
That's Crafty! Multi-Surface Paints: Ivory, Chestnut Brown, White, Antique Gold
That's Crafty! Texture Paste
Plaid Folkart Painted Finishes Kit Rust
Archival Ink Potting Soil
Calico (from That's Crafty! Mixed Media Journal Kit)
That's Crafty! Walnut Ink Crystals
Sandra Evertson Relics & Artifacts Resin Heart
Nettle Yarn
Rusted Wire
Instructions
Prepare Chunkie by assembling with craft adhesive before applying Chestnut Brown paint. Follow this by applying the Crackle Glaze (following instructions) then the top coat of Ivory and White paint. Also prepare the resin heart with the same supplies but with emphasis on the White more than the Ivory paint.
Prepare the stencilled calico by partially stencilling Mandala, with the Texture Paste, onto calico which had been stained with tea and coffee.


If Chunkies are new to you, then you might want to take a look HERE at the different sizes/styles available.
Wishes
Lynne


