

Hello!
I have a little bit of magical artwork to share today as you see, I really do have fairies at the bottom of my garden! I wanted to show that Melina's fabulous new artist trading coin stamp designs can be used on all sorts of projects including my mixed media fairy scene.
Step by Step:
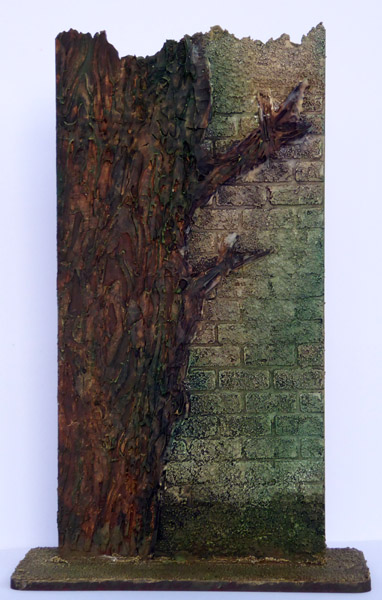
I first prepared my chosen upright panel, starting with the top piece. I took the 6.5x7.5 brick repeat stencil and used this with texture sand paste to add pattern to part of the panel in a roughly sloping shallow diagonal shape. I left this to dry.
I then took the 6.5x7.5 tree bark stencil and used this with texture paste to create my tree in the remaining space. I had to do this in stages, drying in between and in a couple of places added a touch of texture paste and scraped the pattern on with a cocktail stick. This was mainly because I wanted a couple of branches and it was simpler to do this by hand.

As you'll see, it looks a bit odd at this stage but next come the paint layers. I painted the tree with watered down chestnut brown, black and evergreen multi surface paints then painted the wall with watered down apricot, light pink and grey. I added some green at the base of the wall to look like moss.

I next decided to make the wall look more worn so I first misted on ochre flat matte spray, followed by walnut, more ochre, basil then further ochre and it ended up looking like the photos below. At this point I covered the base section with texture sand paste and when it was dry, dabbed on watered down chestnut brown and green multi surface paints. When these were dry, I misted on ochre flat matte spray and glued the pieces together.


As you'll see, it looks a bit odd at this stage but next come the paint layers. I painted the tree with watered down chestnut brown, black and evergreen multi surface paints then painted the wall with watered down apricot, light pink and grey. I added some green at the base of the wall to look like moss.

I next decided to make the wall look more worn so I first misted on ochre flat matte spray, followed by walnut, more ochre, basil then further ochre and it ended up looking like the photos below. At this point I covered the base section with texture sand paste and when it was dry, dabbed on watered down chestnut brown and green multi surface paints. When these were dry, I misted on ochre flat matte spray and glued the pieces together.

I stamped a variety of toadstools on smooth cartridge paper and coloured them with a mix of flat matte sprays and Zig Clean Color Brush Pens. I cut the images out and rounded them for dimension with a large embossing ball tool.
I then took a couple of greyboard fairies and coloured them with pencils. I stamped on the wings with the dragonfly wings from one of Lynne's Affirmations sets and used Brilliance Pearlescent ink for some shimmer.


I die cut some tiny leaves using a Tim Holtz set of leaf dies and scraps of green painted paper from my bits box.
I assembled the panel as you see in the main picture, using dimensional adhesive for a 3D effect. I finished off with my chosen text, also stamped on a scrap of green painted paper.
Supplies:
That's Crafty! Surfaces - MDF Jagged Edge Upright
That's Crafty! Greyboard Bits & Pieces Sheets - Fairies and Hummingbirds, Fairies and Wings
That's Crafty! Clear Stamp Set - ATCoins Stamp Set 8 by Melina Dahl
That's Crafty! Clear Stamp Set - Shroom Sweet Shroom by Melina Dahl
That's Crafty! Clear Stamp Set - Shroom Town by Melina Dahl
That's Crafty! Clear Stamp Sets - Lynne's Affirmations Set 2, Set 9
That's Crafty! 6.5 x 7.5 Stencil - TC7022 Brick Repeat
That's Crafty! 6.5 x 7.5 Stencil - TC7023 Tree Bark
That's Crafty! Texture Sand Paste
That's Crafty! Texture Paste
That's Crafty! Multi Surface Paints
That's Crafty! Flat Matte Sprays
That's Crafty! White Gesso
Kuretake Zig Clean Color Real Brush Pens
Dimensional Glue
Leaf Die (I used a Tim Holtz set)
I hope you like my little magical garden.
Have a great weekend, stay warm and see you next week.
Fliss x


