
Hello

Laura, has generously allowed me to share a project featuring upcoming stamps from me, which will not be available until 11th February.
In coming weeks I will share the little backstory of the stamps but for today, sharing a peek at some of the stamps in my latest handmade book.
Supplies
That's Crafty! Clear Stamp Set The Language of Trees Sets 1 and 2
That's Crafty! Stencil - Rounds/Circles TC40002
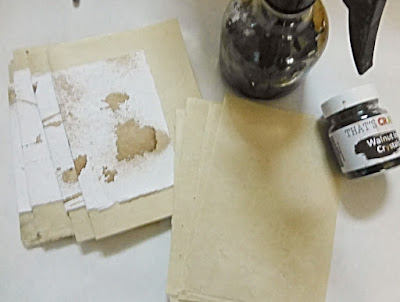
That's Crafty! Walnut Ink Crystals
That's Crafty! Liquid Acrylic Wax
That's Crafty! Flat Matte Spray: Raspberry
That's Crafty! Teabag Paper
Archival Ink Jet Black
Extras: Handmade Paper, Wax Thread, Needle
Instructions
To prepare the teabag paper,

I misted with water, scrunching in my hands before generously applying walnut ink. As it dried, Raspberry Flat Matte Spray was spritzed, here and there and then leaving to dry. Once dry, the amazing Acrylic Liquid Wax applied and when dry, more scrunching.

I then tore the panel to the size required for the cover, with double the height, allowing me to fold it over. When I folded over, I realised I wanted more stability to the cover, so I slipped a piece of cotton rag paper in-between. Cotton rag because it provides stability yet flexibility which watercolour paper wouldn't provide.
Laying this aside, focus turned to the signatures, I chose Lokta paper but it could be any paper that you favour, that's what I love about making my own books. Each panel, torn to A5 size, sprayed with walnut ink. Alongside the Lokta, four pieces of A6 cotton rag, also sprayed with Walnut Ink.
Leaving them to dry, I then turned to stamping. Inking up one of the trees from Language of Trees set.

A circle was cut from paper I had previously prepared, cotton rag prepared with Flat Matte Sprays and Gesso. Before applying Acrylic Liquid Wax, the circle edged with black watersoluble pencil.

Onto a scrap piece of paper, text from Language of Trees, "we are sisters of the earth" along with four words.
More circles were cut from stained teabag paper, four circles of the same dimensions and some smaller circles.

Assembling the book, the four signatures were stitched onto the A5 cotton rag, which is then stitched onto the waxed, teabag paper cover.
In this photo of the stitched spine, it is a work in progress, later checking the threads are tightened up and small knot made for each signature.

Onto the inside page, words from the Language of Trees, layered onto scrap piece of stained teabag paper which had Liquid Acrylic Wax applied, with the same type of paper used for circles above and below stamped words.

A circle is half adhered to edge of upper piece of smaller cotton rag,
Silence ....

Serenity .....

Fragile ....

Wisdom ....

Stamp "spirit" from one of the Affirmations, layering onto a small circle cut from cotton rag paper prepared with gesso and walnut ink. Layer this to front cover of journal.


This is a simple binding, creating four rows of four holes in the cover, through which the signatures are stitched.

That's Crafty! with Jo Channon at the helm, will be showcasing a O.D.S. (One Day Special) on HOCHANDA, beginning on 11th February. All details along with a multitude of fabulous sneaky peeks of projects made by the That's Crafty! HOCHANDA D.T., will be appearing on social media.
There are many (and I mean, MANY!) new products being released so keep an eye out for those.
Wishes
Lynne

Laura, has generously allowed me to share a project featuring upcoming stamps from me, which will not be available until 11th February.
In coming weeks I will share the little backstory of the stamps but for today, sharing a peek at some of the stamps in my latest handmade book.
Supplies
That's Crafty! Clear Stamp Set The Language of Trees Sets 1 and 2
That's Crafty! Stencil - Rounds/Circles TC40002
That's Crafty! Walnut Ink Crystals
That's Crafty! Liquid Acrylic Wax
That's Crafty! Flat Matte Spray: Raspberry
That's Crafty! Teabag Paper
Archival Ink Jet Black
Extras: Handmade Paper, Wax Thread, Needle
Instructions
To prepare the teabag paper,

I misted with water, scrunching in my hands before generously applying walnut ink. As it dried, Raspberry Flat Matte Spray was spritzed, here and there and then leaving to dry. Once dry, the amazing Acrylic Liquid Wax applied and when dry, more scrunching.

I then tore the panel to the size required for the cover, with double the height, allowing me to fold it over. When I folded over, I realised I wanted more stability to the cover, so I slipped a piece of cotton rag paper in-between. Cotton rag because it provides stability yet flexibility which watercolour paper wouldn't provide.
Laying this aside, focus turned to the signatures, I chose Lokta paper but it could be any paper that you favour, that's what I love about making my own books. Each panel, torn to A5 size, sprayed with walnut ink. Alongside the Lokta, four pieces of A6 cotton rag, also sprayed with Walnut Ink.

Leaving them to dry, I then turned to stamping. Inking up one of the trees from Language of Trees set.

A circle was cut from paper I had previously prepared, cotton rag prepared with Flat Matte Sprays and Gesso. Before applying Acrylic Liquid Wax, the circle edged with black watersoluble pencil.

Onto a scrap piece of paper, text from Language of Trees, "we are sisters of the earth" along with four words.
More circles were cut from stained teabag paper, four circles of the same dimensions and some smaller circles.

Assembling the book, the four signatures were stitched onto the A5 cotton rag, which is then stitched onto the waxed, teabag paper cover.
In this photo of the stitched spine, it is a work in progress, later checking the threads are tightened up and small knot made for each signature.

Onto the inside page, words from the Language of Trees, layered onto scrap piece of stained teabag paper which had Liquid Acrylic Wax applied, with the same type of paper used for circles above and below stamped words.

A circle is half adhered to edge of upper piece of smaller cotton rag,
Silence ....

Serenity .....

Fragile ....

Wisdom ....

Stamp "spirit" from one of the Affirmations, layering onto a small circle cut from cotton rag paper prepared with gesso and walnut ink. Layer this to front cover of journal.

A few photos of the journal


This is a simple binding, creating four rows of four holes in the cover, through which the signatures are stitched.

That's Crafty! with Jo Channon at the helm, will be showcasing a O.D.S. (One Day Special) on HOCHANDA, beginning on 11th February. All details along with a multitude of fabulous sneaky peeks of projects made by the That's Crafty! HOCHANDA D.T., will be appearing on social media.
There are many (and I mean, MANY!) new products being released so keep an eye out for those.
Wishes
Lynne


