Hello everyone.
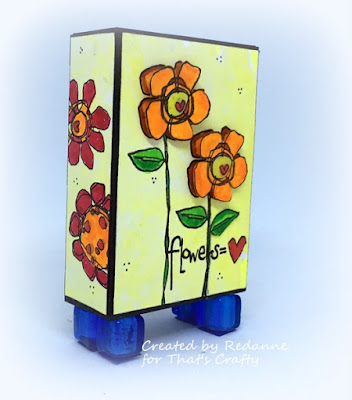
I know that ATCoins are so popular at the moment, but That's Crafty's Chunky ATCs really have stolen my heart! For my Guest designer project this week I have created a
Funky Flower chunky ATC.
The chunkies go together like a dream and they are lightweight but sturdy.
Here are the steps I took:
1) Glue the Chunkie together and set aside to dry.
2) Paint a piece of watercolour card and whilst wet, dab with cling film to create a pattern.
3) Paint all of the edges of the Chunkie with black paint - you only need to do the edges as you are going to cover the Chunkie with the cardstock.
4) Cut the painted cardstock to fit each side of the Chunkie, edge with black marker.
5) Stamp and colour your chosen funky florals with watercolour paint.
6) Stamp and colour a second set of funky florals to layer up the front and back florals.
6) Assemble the Chunkie as shown and add some gloss to the centre of each flower, I used DecoArt Liquid Glass.
7) Stamp a sentiment to the front, back and top of the Chunkie.
8) Add some simple doodles for some added interest.
9) Add beads to create feet for your Chunkie.
Products Used:
That's Crafty! Surfaces - MDF Chunkies - ATC
AALL & Create Stamp #158 - Freestyle Flowers
Dina Wakley Heavy Body Acrylic Paint - Black
Ranger Archival Ink - Jet Black
13Arts Watercolour Paint
Tim Holtz Watercolor Cardstock
That's Crafty! Multi Purpose Adhesive
DecoArt Liquid Glass
Beads from my stash
Thanks so much for your visit.
Crafty wishes, Anne x
I know that ATCoins are so popular at the moment, but That's Crafty's Chunky ATCs really have stolen my heart! For my Guest designer project this week I have created a
Funky Flower chunky ATC.
Here are the steps I took:
2) Paint a piece of watercolour card and whilst wet, dab with cling film to create a pattern.
3) Paint all of the edges of the Chunkie with black paint - you only need to do the edges as you are going to cover the Chunkie with the cardstock.
4) Cut the painted cardstock to fit each side of the Chunkie, edge with black marker.
5) Stamp and colour your chosen funky florals with watercolour paint.
6) Stamp and colour a second set of funky florals to layer up the front and back florals.
7) Stamp a sentiment to the front, back and top of the Chunkie.
8) Add some simple doodles for some added interest.
9) Add beads to create feet for your Chunkie.
Products Used:
That's Crafty! Surfaces - MDF Chunkies - ATC
AALL & Create Stamp #158 - Freestyle Flowers
Dina Wakley Heavy Body Acrylic Paint - Black
Ranger Archival Ink - Jet Black
13Arts Watercolour Paint
Tim Holtz Watercolor Cardstock
That's Crafty! Multi Purpose Adhesive
DecoArt Liquid Glass
Beads from my stash
Thanks so much for your visit.
Crafty wishes, Anne x


