Hi Everyone
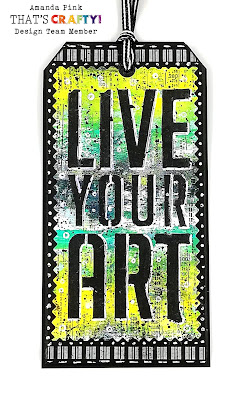
It's been one of those weeks for me where due to unforeseen circumstances my creative time has been very limited so the mixed media tag I'm sharing today was real quick and easy to make.
I have an ever growing stash of 'cast aside with the intention to use later' backgrounds so with time being short I thought this would be a good opportunity to rummage through them and select one to use for this tag.
I chose one that I created at the same time I created the background for my 'Moon Burst' project that I shared here and here at the start of this year.
Guess this one got lucky as some of the stash have been there for years!!
It's a gel print created with a gel plate and just a few of Dina Wakley heavy body acrylics: Lemon, Turquoise, Night.
I simply applied drops of the paint to the plate, brayered then out across the horizontal, laid a piece of white card on top, rubbed over the card lightly and then lifted the card to reveal the print.
I cut a piece from the print to roughly fit a That's Crafty! #8 White/ Greyboard tag and adhered it in place cutting and sanding back any overhang/ excess.
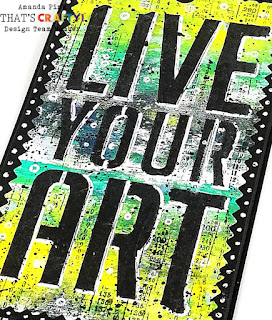
The focal words 'Live Your Art' were stenciled with Deco Art black modelling paste.
This stencil is one designed by Donna Downey and comes from a larger stencil that is made up of 4 stencil designs- 2 quotes, 1 letters, 1 numbers so a great mix. The four stencils can be kept and used as is or they can be cut away from teach other for ease of use.
Once the paste was dry I added some white pen highlights to help the letters stand out more.
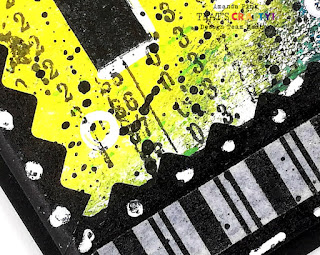
For some background detail I added some open white circles using a white pen and That's Crafty! dinky 'Bubbles' stencil some jet black archival ink stamping using Tracy Evans AALL & Create 'Reckoner Digits' stamp and some splatters of black and white paint.
A couple of Tim Holtz Halloween trim tapes helped frame the focal words and add a touch more detail and interest along the top and bottom and down the sides of the tag.
Just a touch of white pen mark making on the plain black jagged tape and the tag was ready for its hanging ribbon.
That's Crafty! White / Greyboard Tags #8
White Card
That's Crafty! Multi Surface Craft Adhesive
Deco Art Black Modelling Paste currently o/s. Any Black Texture would be ok. You can browse some options here including That's Crafty's Black Texture Paste which I would have used but have yet to add to my stash.
Dina Wakley Heavy Body Acrylics: Lemon, Turquoise, Night.
Archival Ink: Jet Black
AALL & Create Stamps: #543 'Reckoner Digits' designed by Tracy Evans
Donna Downey Stencils: Live- DD4-008
That's Crafty! Dinky Stencil: 'Bubbles Background' (TC005)
Tim Holtz Halloween Trim Tape
Gel plate
Brayer
Palette Knife
Thanks for stopping by today.


No comments:
Post a Comment
Thank you for taking the time to leave a comment on our blog, we really appreciate it.
Note: only a member of this blog may post a comment.