Hi Everyone
I'm back with you this week and I've made my first Christmas card of the year.
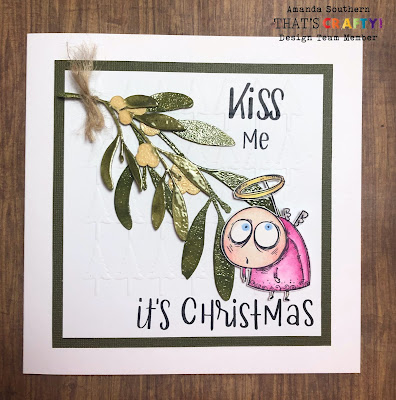
For the background for the card and to give some texture to the white space of the card I've used the same Christmas Tree 6" x 6" stencil I used last week but this time, and to get more uses from your stencils, I have this week embossed the card using the stencil. If you haven't done this before it gives the same effect as using an embossing folder except you can use your stencil collection. First and most importantly before doing this make sure that your stencil is absolutely clean or else you will transfer it to your card, Ask me how I know? LOL. Anyway with a squeaky clean stencil this is what I did to create the embossed effected. I wanted some stamping on the top right of the card so I first stamped those words onto the card, I used an uncoated piece of white card for this. I used black Archival ink as it is quick drying, if you are using a slower drying ink make sure your stamping is dry before continuing.
On top of the stamping I lined up my stencil and held it in place with some low tack tape, don't use anything too sticky.
Then make up your sandwich for passing through your die cutting machine, provide the size of your stencil fits through all machine will do this but you will need to refer to your machines sandwich guide. Pass it through your machine, I only passed through once using a Gemini machine.
Peel off your stencil tape slowly as to not rip your card and you have an embossed piece of card using your stencil.
I then stamped the "It's Christmas sentiment along the bottom.
With my background done I set to with my mistletoe, these are a couple of sizes of That's Crafty! Holly & Mistletoe A4 Sheet. The larger has been coloured using Distress Oxides in Peeled Paint and Antique Linen and then the corresponding Distress Glaze applied and heated, the smaller branch I just used the Distress Glaze to create a lighter shade. On both I first coloured and glazed the berries applying both the colour and embossing ink using a detail blending tool, great for creating the berries. I then did the leaves using the detail blender. The Distress Glaze gives a lovely sheen and texture to the Craftyboard pieces. I went around the edges of the Craftyboard with a Peeled Paint Distress Marker. I then tied both branches together using a piece of twine.
My little Angel was then stamped with archival and coloured using coloured pencils and cut out with a slight white border. These were then both added to the stencil embossed background and then all mounted onto to a piece of coordinated green card.
Here's What I Used:
Tim Holtz Distress Embossing Glazes - Antique Linen & Peeled Paint
Tim Holtz Distress Oxide Ink Pads - Antique Linen & Peeled Paint
Versamark Embossing Ink Pad (the glazes can be applied directly to the wet distress ink)
Katzelkraft A5 Stamp Set - Les Pabos Sherlock HolmesLow Tack tape
Coloured Pencils
White Card
Green Card
7" x 7" Card Blank
Die Cutting Machine
Have a great week and I'll be back next Tuesday
Love
Amanda X


Love this Amanda. Such a cute and quirky image and the embossed background gives such lovely texture.
ReplyDeleteSorry for the lack of comments lately, not enough hours in the day!
Fliss xx