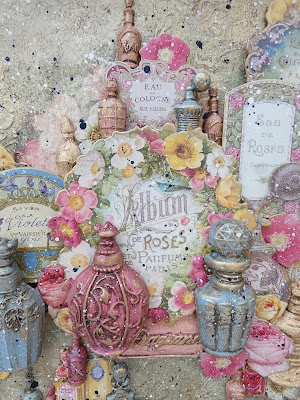
Having had two steampunk makes since the start of the year I thought this week I would have a change and do something a little more feminine but with a Vintage feel. The base of this piece is a 12 x 12 dimensional canvas that is set in a large frame from a well know Swedish furniture shop.
To start my make I tore our the central part of the Album de Roses rice paper and adhered it centrally in the canvas with Matte Decoupage glue. The remaining corner fragments of the rice paper were then clued to the 4 corners of the canvas. I made sure that I sealed the surface of the rice papers with the decoupage glue as this means it is easy to wipe off mediums later on if you so wish. Next I took Garden of Promises Bird Stencil and filled in the gaps using modeling paste ensuring that the pattern overlapped the torn edges of the rice paper. Once the paste was dry I coloured the background using a mixture of paints - Old Ivory, Capuccino and Avocado. I blended the colours to give gentle transitions - you really don't need to be very specific but it helps if you start with the colour closest to the ones in the rice paper and blend out from there.
Next I used Umbre Patina Paste over everything wiping it back to help reveal some of the stencil detail (Vintage Antiquing Paste will do the same thing) before adding gold metallic wax to the surface details and around the canvas edge. - If I am totally honest I think I actually preferred the background BEFORE I did these steps so the choice is yours.
Having created the background I made my embellishments by casting the perfume bottles and title from the Fragrance mould with Amazing Casting Resin. Once set the resin was coated with Bonding Primer before painting. I chose to work with Old Ivory, Aviation Blue, Powder Blush and Warm Red Allegro paints. Once the paint had dried the resin pieces were coated with fluid gloss (Glossy Accents will work) to seal the paints before then using Antiquing Paste to age them in the same way I had the base canvas. Gold wax was then used to highlight the details.
To complete the piece I added the moulded pieces along side lots of the pieces from the chipoard die cuts that co-ordinate with the collection - edging each piece with metallic was and building depth by using pieces of cardboard to lift the elements over each other.
Finally I added splatters of white an black paint to unify the layers.
To decorate the frame I added stencil detail to the mount that came with it using Truffle Deluxe Paste and then glued the canvas centrally in place. The black frame was then painted with Champagne Deluxe Paste but any metallic paint that will adhere to plastic would work just as well.
I hope you like this piece and look forward to seeing your makes inspired by it.


No comments:
Post a Comment
Thank you for taking the time to leave a comment on our blog, we really appreciate it.
Note: only a member of this blog may post a comment.