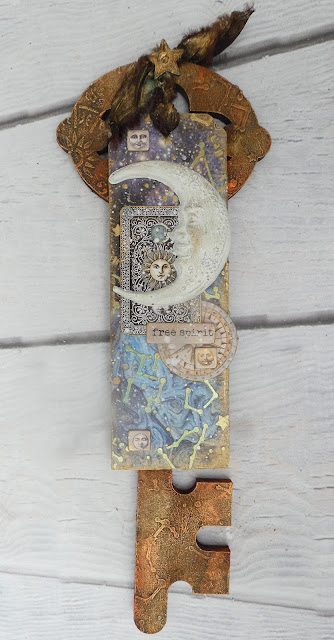
This piece is definitely a little different and came about as I knew I wanted to use the Pentart Rust Effect Paint Set and so set about my stash and found one of the MDF Keys which I thought would be the perfect substrate to use to show off this product. But before we start with the key I also knew that I wanted to add a tag on the front and so chose one of the bookmark sized tags from the MDF Tag set.
To start creating I added paper from the Cosmos Infinity 12 x 12 papers to the front and back of the tag and once the glue was dry mixed some Heavy Body Gel Glossy with some Gold Glamour Pigment and in a separate area also mixed some Heavy Body Gel Glossy with Turquoise Glamour Pigment. This is such a good way of making your own stencil paste. Once the pastes were mixed I then applied them to the front of the tag through the Constellation stencil mixing the two colours as I worked.
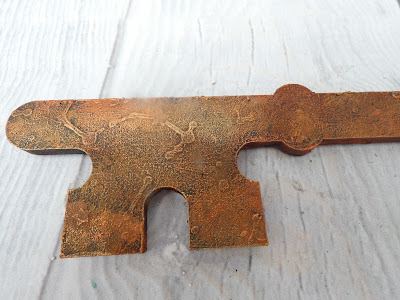
Whilst the tag was drying rather than discarding the excess coloured heavy body gels I had made I applied them through the same stencil to the key and left it all to dry. Once the paste on the key had dried I painted the darkest brown from the rust paint set all over and let it dry before literally just adding splodges of the other paints at random over the top until I was happy with the effect. Finally I added some more areas of the dark brown paint mixed with the fine powder in the set for a little added texture. Once the key had dried I then added Firegold wax to the edges and over the stencilled areas - you could use Copper wax to give a very similar result.
I then turned my attention back to the tag choosing some Cosmos Infinity die cuts which I edged with Gold wax and then gave the tag the same attention. For the focal element on the tag I cast the moon from the Sun and Moon mould using my go to Amazing Casting Resin. The resin piece was then primed with White Primer Paste. To colour the moon I then took the palest green/blue in the Pentart Patina Paint Effect Kit and lightened it by mixing with more White Primer Paste before covering the moon. Once dry I then added some more wax over the top mixing some gold with a lot of silver to get a white gold effect. The die cuts and moon were then applied to the tag as shown.
I like my pieces to have a title so chose the word "free spirit" from the printed chipboard and edged it with gold before adhering in place. The tag was then splattered with watered down primer paste. Finally I tied the tag to the key adding some of the glamour dust to the ribbon so that it tied in with the rest of the project.
Whilst this piece is intended to be purely decorative it would also serve well as a giant keyring for those that like me often misplace my keys in plain sight. I know I had a lot of fun making it and hope that it inspires you to get your crafty goodies out and have a play.


No comments:
Post a Comment
Thank you for taking the time to leave a comment on our blog, we really appreciate it.
Note: only a member of this blog may post a comment.