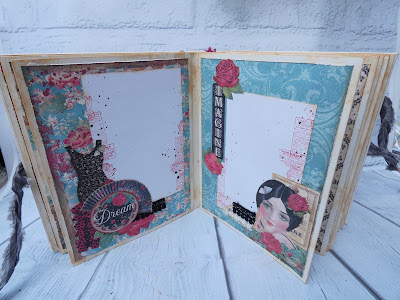
Included in the latest Stamperia release is a Canvas Album Kit which I decided I needed to have a play with. A word of warning though, my kit came with instructions that are super easy to follow BUT it says add a piece of cloth to the spine on the inside which is not included in the kit so I added a piece of my own. Next to make the pages the diagrams say take 3 pieces of card with score lines and center them on each other - easy enough to follow BUT I had 4 in my kit so used all 4 making 8 pages not the 6 intended (I had to raid a second kit set for the extra two pages so its an expensive mistake to make) and then adhere the layered pages onto the spine. Now to avoid this unless of course you want 8 pages not the intended 6, I suggest you take the biggest of the 4 pieces with score lines and adhere that to the spine of the book instead of following the instructions and adding a piece of cloth. That way you won't need to find an extra piece of cloth or raid another pack for extra pages.
Having made up my album I added some detail to the cover using the La Traviata stencil and Volume Paste and then left it to dry whilst I made the internal pages.
I prepared watercolour paper photomats that are 4" x 6" adding stamping with elements from the Borders and Frames Set and the rose from the Desire Elements stamp sets using Red Geranium Archival ink. To complete the photomats I then added splatters of leather Aqua Colour but watered down Vintage Photo Distress ink will work just as well before edging with more Vintage Photo Distress Oxide.
As is typical for my when making an album I follow a fairly formulaic approach so that the pages are cohesive. I started by cutting papers from the 12 x 12 Backgrounds collection to the inside of the album cutting these 15cm wide x 20.5cm high then distressed and inked the edges with Vintage Photo Distress Oxide ink. To give myself usable pieces for flaps I cut the papers at 20.5cm before dividing in half for the page covering. I then decided where I wanted to add flaps and chose to do a combination of landscape opening and portrait opening flaps. I used the off cuts from cutting the base pages, cut these in half and then scored at 1" from one or other end depending on how I wanted the flaps to open. These pieces were also distressed and inked.
The inside front cover and first page (remember this is extra to the intended making up of the album) were kept relatively flat to ensure there is enough space to close the book easily and so I simple took another off cut from page preparation split it in two, distressed the edges and adhered on three sides to create a large pocket. To decorate the pocket I then added embellishments cut from the paper pack and also the Collectables paper pad tucking in a little black lace for extra detail.
Pages two and three have side opening flaps decorated as shown.
Pages four and 5 have simple photomats with added embellishments.
Pages six and seven have top opening flaps with added embellishments.
Pages eight and nine have side opening flaps.
Pages ten and eleven are simple photo mats with paper embellishments.
Pages twelve and thirteen have top opening flaps and in addition I added some extra decorative elements to the photomat below.
Pages fourteen and fifteen have side opening flaps.
Page sixteen and the inside back cover are pocket panels.
Having completed the inside I added Vintage Photo Distress Oxide to the white base of the album and also to the outside cover as I wanted the whole piece to have a vintage style.
For the front and back covers I created some resin elements using Amazing Casting Resin and Desire Elements Mould for the fan and Roses mould for the roses and leaves. The cast pieces were coated with Bonding Primer before painting. I added Burgundy paint to the fan and roses and used a mixture of Garden Green and Hunter Green Allegro paints to the leaves. The moulds were then covered with varnish to protect them before adding distressing effects. For the rose moulds I added Cherry Lasur to the roses and then wiped it back to leave it in the details adding depth to the roses. For the leaves I used Country Green Lasur Gel to bring out the leaf detail. For the fan I added Ebony Lasur and wiped back so it gave the fan an aged appearance.
Once the elements were ready they were then layered in place on the cover.
When adding in the elements to the front I sandwiched in a piece of shabby ribbon aligning it with a second piece on the back of the album.
Finally I added another splatter of Leather Aqua Colour - but watered down dark brown paint or burgundy paint would work just as well.
I hope you like the album and have a safe week.


No comments:
Post a Comment
Thank you for taking the time to leave a comment on our blog, we really appreciate it.
Note: only a member of this blog may post a comment.