Hi Everyone
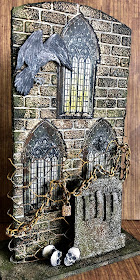
Well today is the 1st of October and the month of spooks and scares begins, and to start the chills and shivers I have a piece to share with you that was made as a demo piece to showcase some of the recently released Halloween stamps and MDF pieces by That's Crafty! that featured on Hochanda.
There is nothing more spooky than an old graveyard that sprawls out from beyond the walls of a derelict church. A church that no longer enjoys the rejoicing from its congregation yet instead harbours a disturbing past that nobody dare speak of for fear of the consequences of the evil that now surrounds it. On the 31st of the month of October a light can be seen shining from one of the windows, nobody knows who lights the light and nobody is brave enough to look. Are you?!
Here's What I Did:
Starting with a That's Crafty! MDF Upright I had to create the wall of my church and I wanted the windows to be set within the stones so I first stamped the window 3 times onto separate post it notes and cut them out and laid them onto the MDF so that they would act as a mask.
I gave the MDF a layer of grey acrylic paint I then stencilled through the brick stencil with That's Crafty! Sand Texture Paste and before I left it to dry I removed the stamped post it notes so that the shape of the windows were left in the texture paste. Whilst the paste was drying I stamped the window 3 times again, this time on stamping card. I coloured them with Distress inks and cut them out so they were ready to slot into the spaces within the brick work.
I then took one of the MDF tomb stones (the larger of the 3) and smeared some Sand Paste all over it to add some texture to make it look made of stone. I also gave the base of the MDF Upright a covering of Sand Paste. Once all the Sand Paste was dry I aged the brick and stone work using a selection of colours of That's Crafty! acrylic paints applied with a piece of sponge to add further texture. To finally age it further I added dry rubbing of black acrylic paint and a dark green acrylic paint. The same to the base and the Tomb stone. To add the letters RIP I used some chipboard alphabet letters and gave them the same make over and glued on to the tomb stone.
To keep people out of entering the church I had to make it secure and this was done using some chicken wire that I had given a rusty look using acrylic paints and to further secure it and I am not actually sure if this is to keep something in or something out!! was to wrap chains around it and secure it all with a padlock, again all aged and rusted using acrylic paints.
I stamped the rook or raven, it could be either, and coloured it with coloured pencils and positioned it as being the bravest thing to try and look through the window or maybe it's keeping watch?
Some skulls lay beside the tombstone, are they the bones of those who tried and failed to find the secrets that lie within?
Would you attempt to enter to find out what lies within, or would you run?
I know what I would do...................
Here's What I Used:
or
That's Crafty! Halloween Uprights Kit which includes MDF Tombstones and MDF Halloween Pieces
That's Crafty! Stencil 6.5" x 7.5" - Brick Repeat
That's Crafty! Multi Surface Paints - Chestnut Brown, Grey, Orange, Black, Evergreen
Versafine Clair Ink Pad - Noctourne
That's Crafty! Clear Stamp Set - Happy Hauntings
Post It Notes
Chicken Wire
Chain
Lock Charm
Washing Up Sponge
I hope you made it to the end of this post and weren't too scared!!
See you all next Tuesday
Love
Amanda X


Wow - a fantastic haunted church and graveyard... brilliant textures and such great spooky detailing with the skulls and the weathered rusty padlocked chain. Love it!
ReplyDeleteAlison x
This looks absolutely amazing Amanda! Such fabulous textures and details and so glad you shared how you created the windows as I was intrigued by them being set in the church walls.
ReplyDeleteA great spooky start to the Halloween month.
Fliss xx
Absolutely fantastic , Amanda . Brilliantly haunting .it stood out a mile on the hochanda shows . x
ReplyDelete