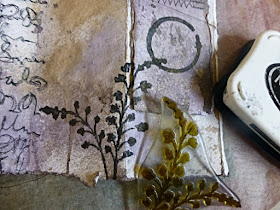
Thought I would share a handmade book this week. The photo above shows the book partially open.
This is a photo heavy post and I also plan on sharing a wee video of the book on FaceBook and Instagram.
Supplies
That's Crafty! Clear Stamp Set Lynne's Wildflowers Set 1
That's Crafty! Clear Stamp Set Lynne's Wildflowers Set 2
That's Crafty! Clear Stamp Set ATCoins Set 11
That's Crafty! Clear Stamp Set Textures Collection Set 2
That's Crafty! Lustre Aubergine
That's Crafty! Tea bag paper and Walnut Ink Crystals
That's Crafty! Flat Matte Spray Walnut Ink
That's Crafty! Flat Matte Spray Blackberry
13 Arts Clear Stamp Script
13Arts Ayeeda Mist Pearl Silver
Memento Ink Tuxedo Black
Kraft-tex White (That's Crafty! stock a Sampler pack which contains white alongside other colours)
Sewing Machine
Lutradeur
Handmade Paper Scrap
Buttons
Instructions
I started by preparing white Kraft-tex. I don't have photos for all the steps but will share what I do have.
The Kraft-tex would form the cover for this wee book. I cut it to a required size before applying walnut ink with a large brush. I like a large Chinese brush for this purpose but that is only a personal preference. This was allowed to air dry and it does take some time, best to leave it overnight to dry, before flipping over and repeating on rear side.
This photo shows the walnut ink but on a different piece of Kraft-tex (used on another book) but allows you to see how liberally I apply the Walnut Ink.
Next, I gathered the pages. In this photo you can see I machine stitched the paper panels together and they were subsequently machine stitched to the prepared Kraft-text.
For the cover, I coloured with Lustre Aubergine: a panel of Tea bag paper, piece of slightly smaller Lutradeur and scrap of handmade paper. This was machine stitched to the cover. To bring a detail to the cover, other than the vintage buttons, I dipped the end of the spray nozzle from the Pearl Silver Ayeeda Mist to form dot like marks.
I had some new stamps to play with! On seeing the recent release from That's Crafty! ATCoins set 11, I immediately saw the opportunity to use the word stamps almost as found words to create my own sentiments.
The words were stamped onto scraps of the paper, again stained with Lustre Aubergine. Adhered within the a stamped circle and simply scribbled around each word tile.
Throughout the book, for both sides, I featured some Wildflowers.
I normally reach for script stamps from That's Crafty! Texture Collections but the 13Arts Script stamp brings a different energy, a boldness to it.
I wanted to bring attention to the Script stamp. For some areas, I only partially inked up the stamp, wanting a grungy effect and in other areas, you can see, it is second generation stamping.
This is the second circle on the ATCoins set with more of the words from that same set formed into a sentiment.
A peek at the pages. You can see clearly the addition of the Walnut Ink and more of the Lustre Aubergine and Blackberry on the pages.
When we make our own books, the possibilities are endless!
Another photo!
Another example of forming the stamped words into a sentiment
I could make my life so much easier if I machine stitched the book as the final process but I've come to realise, I like to form books first. It is the enjoyment of the process of making books and sometimes, allowing them to patiently wait until I decide to fill them.
If you haven't seen the That's Crafty! Clear Stamp Set ATCoins Set 11 then please take a look. This set contains 49 stamps and with words that you will ink up time and again. I like that this set is part of the ATCoins stamp collection but as with all those sets, they are useful far beyond ATCoins. I know I will be reaching for this set to seek out words which I can enjoy forming into different sentiments.
Wishes
Lynne


Another gorgeous hand crafted book, Lynne holding so many lovely creative touches both inside and out. Tfs x
ReplyDeleteThis is beautiful, Lynne, evokes such peace :)
ReplyDeleteSuch a beautiful book Lynne. The colours and textures are gorgeous and all the stamped detail looks amazing.
ReplyDeleteFliss xx
Thoroughly enjoyed reading your step by step details Lynne x Lots of inks/techniques and I love the way the stitched details compliment the various papers.
ReplyDeleteThank You for sharing this beautiful book
Hugs Annie xx
Thank you, each and every one for your lovely supportive comments xx
ReplyDeleteLynne,I have only recently discovered you on Pinterest. Being very new to mixed media and collage each piece of your beautiful art touches my soul and inspies me to continue with my endeavours.
ReplyDeleteThank you, Cheryl